
We get it – building strong customer relationships and boosting sales through email marketing can feel like navigating a digital maze. With countless email marketing strategies and email marketing tips swirling around, it’s tough to know where to focus your marketing efforts.
Fear not! We’re here to break down 10 tactics to transform your inbox from neglected to thriving. Let’s dive in and create better email marketing campaigns together!
This article is part of our Email marketing guide.
10 Successful Email Marketing Strategies
Ready to turn those casual scrollers into loyal customers? It all starts with a right email marketing strategy. These proven tactics will help you connect with your audience and drive results.
Build a High-Quality Email List
A robust and engaged email list is the foundation of any successful email marketing campaign — see our full breakdown on how to build an email list for the long-form playbook. Think of it as building a community of individuals genuinely interested in what you offer. Instead of casting a wide net, focus on attracting the right email subscribers who are genuinely interested in your brand and more likely to become loyal customers.
How do you achieve this? It starts with providing value upfront. Don’t just ask people to subscribe; give them a compelling reason to join your community.
A well-crafted offer can make all the difference, considering that the average popup conversion rate is 4.65%. That means you can engage almost 5% of your website traffic before it’s gone for good.
Here are three ways to build a high-quality email list:
- Use lead magnets. Entice potential subscribers with valuable incentives like ebooks, checklists, or exclusive discounts in exchange for their email addresses. Promote these incentives in your blog posts and other marketing channels for better reach;
- Use double opt-in. Implement double opt-in to ensure email addresses are valid and subscribers are genuinely interested. This involves sending a confirmation email after filling in the signup form, asking users to verify their subscription;
- Never purchase an email list. Resist the temptation to take shortcuts. Purchased lists are often filled with inaccurate or inactive addresses, harming your sender reputation and deliverability. For winning email marketing strategy focus on organic list-building.
Craft Compelling Subject Lines
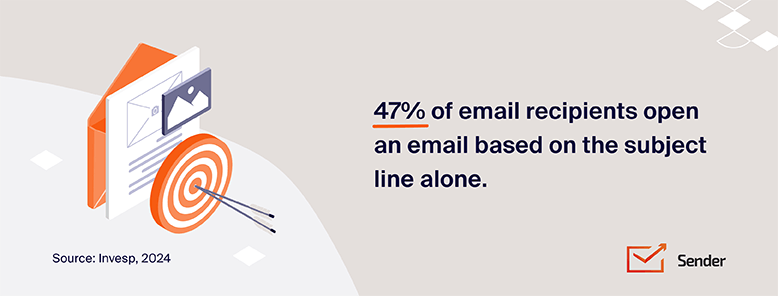
Think of your email subject line as a first impression – and you only get one shot. It’s crucial to make it count, as 47% of recipients decide whether to open an email based solely on the subject line.
In the crowded inbox battlefield, a bland or generic email subject line is a way to get lost. You need subject lines that grab your target audience’s attention to boost your open rates and entice subscribers to dive into your content.
Here are three ways to craft compelling subject lines:
- Use action-oriented language. Compel subscribers to open your marketing emails by using verbs that inspire action. Think “Download Your Free Guide” instead of “A Free Guide is Available;”
- Create a sense of urgency or curiosity. Encourage immediate opens by incorporating time-sensitive offers or piquing curiosity with intriguing questions;
- Keep it short and relevant. With the average person bombarded by emails, brevity is key. Shorter subject lines (under 70 characters) have the highest open rates.
Focus on Engaging Email Content
You nailed a compelling subject line and lured subscribers in – now it’s time to deliver on that promise! With 61% of all emails being read for 8 seconds or more and almost a quarter (23.5%) being skimmed (2-8 seconds of engagement), your email content needs to captivate immediately.
Remember, 15% of messages get less than 2 seconds of attention!
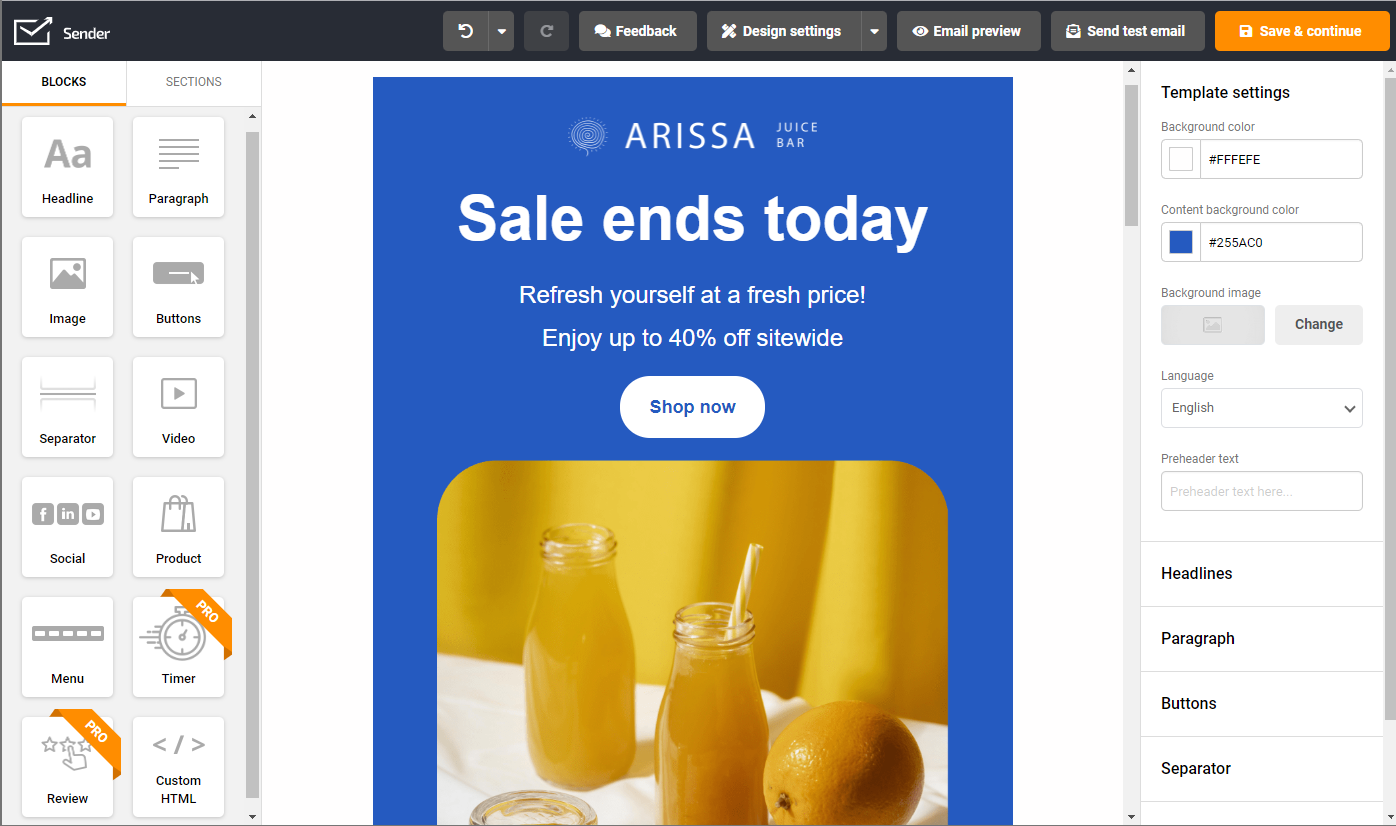
Create emails like a pro—no design or tech skills needed! Just drag, drop, and send with Sender’s easy-to-use email builder.
To avoid falling into the “too short” read category, focus on providing value and keeping subscribers engaged from the first word to the final call to action. This means creating relevant content that truly resonates with their interests and needs.
Consider incorporating dynamic content to personalize the experience further, which can boost sales by delivering a more targeted and engaging message.
Here are three ways to create engaging email content:
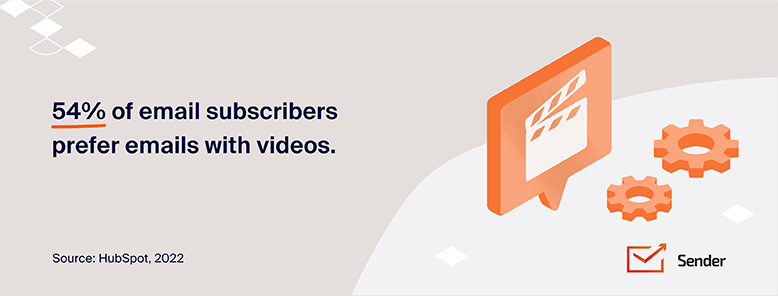
- Use high-quality images and videos. Visuals capture attention and break up text, making your emails more engaging. Use high-quality email visuals and videos relevant to your message and brand to enhance the visual appeal;
- Place clear and actionable CTAs above the fold. Make it prominent and easily accessible “above the fold” (viewable without scrolling) to encourage immediate action, whether it’s visiting your landing pages, or purchasing at your online store;
- Test different CTA colors and text. Experiment with various CTA colors and wording to optimize click-through rates. Email A/B testing can reveal what resonates best with your audience, leading to more clicks and conversions.
Personalize Emails
Gone are the days of generic email blasts that treat all subscribers the same. In today’s personalized world, subscribers crave tailored experiences that speak directly to their needs and interests. This is where email personalization comes in – it’s the secret to fostering stronger connections, boosting engagement, and increasing customer satisfaction.
Why is personalization so powerful? Content that’s more relevant to a particular group simply resonates better. In fact, 88% of users are more likely to respond if an email appears to have been specifically written for them. This means using customer data to craft highly personalized content.
For example, you can use email personalization to send targeted campaigns to existing customers, offering them exclusive loyalty rewards or early access to new products. This level of personalization can lead to a 28.57% increase in click-throughs compared to generic emails.
And it’s not just about engagement – personalized emails generate 6x higher transaction rates! Ultimately, providing a personalized experience makes customers feel seen and valued, so 80% of them are more likely to purchase after such an interaction.

Here are three main ways to personalize your emails (even for potential customers):
- Demographics (age, location, gender). Segment your audience based on demographics to deliver more relevant content. This could involve tailoring offers to specific age groups or customizing messaging based on location;
- Customer behavior (purchase history, website activity). Use customer data to create campaigns based on past purchases or website browsing behavior. Recommend products similar to previous purchases or suggest items viewed but not purchased;
- Engagement level (active vs. inactive subscribers). Tailor your approach based on engagement levels. Send targeted re-engagement campaigns for inactive subscribers while rewarding active subscribers with exclusive content or offers.
A/B Test Your Emails
What works for one audience might fall flat for another, and the only way to truly optimize your email strategy is through consistent and insightful A/B testing. After all, email optimization is an ongoing process.
Don’t be afraid to test everything from subject lines to send frequencies. By analyzing the results of your A/B testing email experiments, you gain insights into subscriber preferences, allowing you to refine your approach and send more effective email marketing campaigns. If you’re already on Sender, our help guide on A/B testing campaigns in Sender walks through the setup.
Here are three key elements to A/B test for a successful email marketing strategy:
- Subject lines. Experiment with different subject line variations to see which ones generate the highest open rates. Test different wording, lengths, and personalization techniques;
- Email copy and visuals. Don’t be afraid to test various aspects of your email copy and visuals. Try different layouts, images, and calls to action to see what drives the most engagement;
- Send times and frequencies. Optimize your email strategy by testing different send times and frequencies. Determine when your audience is most receptive to your messages to maximize opens and clicks.
Use Email Automation
Time is precious, especially for busy marketing managers and small business owners. You don’t have the luxury of manually sending out every email. This is where marketing automation, and more specifically, email automation, becomes your secret weapon.
Email automation allows you to set up pre-defined workflows that trigger specific emails based on subscriber actions or predetermined timelines. This not only saves you valuable time and effort but also nurtures leads and drives conversions more effectively. The numbers speak for themselves: 87% of marketers already leverage marketing automation for their email efforts.
And there’s more good news: automated emails boast impressive engagement rates. In fact, they stand second only to transactional emails in terms of unique open rates (41%), click rates (13%), and click-to-open rates (24%).
Even better, most email marketing tools seamlessly integrate with other marketing platforms, such as your website and CRM. This allows you to create a cohesive marketing campaign where all your efforts work together seamlessly.
Here are three examples of automated emails (besides transactional emails) that can transform your email marketing:
- Welcome emails. Make a great first impression with automated welcome emails triggered when someone subscribes to your list. Use this opportunity to introduce your brand, set expectations, and highlight key products or services;
- Abandoned cart reminders. Recover lost sales with automated abandoned cart emails. These timely reminders gently nudge customers to complete their purchases and can significantly impact your bottom line;
- Re-engagement campaigns. Re-engage inactive subscribers with targeted email sequences. Offer incentives, share valuable content like user-generated content (UGC), or simply remind them why they subscribed in the first place.
Sure, automation simplifies things. But is setting it up simple too? With Sender, absolutely. Our automation builder for email workflows lets you create powerful sequences in under an hour.
Send Emails at the Best Time
You’ve crafted the perfect email, but your hard work might be in vain if it lands in inboxes at an inconvenient or irrelevant time. The timing of your email delivery can significantly impact your open and click-through rates, so it’s crucial to strategize and optimize your send times.
While the best time to send emails varies depending on your audience, industry, and email content, some general best practices can guide your strategy.
Weekdays, particularly Tuesdays and Wednesdays, tend to perform well for B2B and B2C audiences, with send times between 10 a.m. and noon often yielding positive results. However, don’t be afraid to experiment and analyze your data to see what works best for your unique audience.
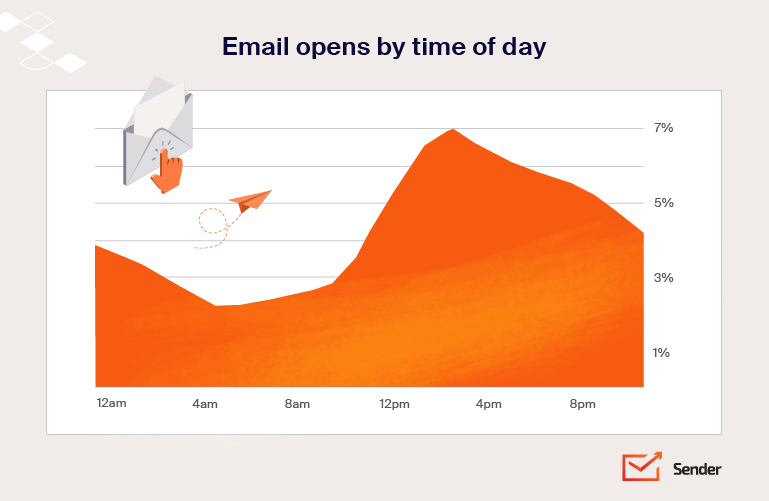
Here are two key considerations for email timing:
- General best practices for email timing: While there’s no magic formula, weekdays between 9 a.m. and noon. are often a good starting point;
- Consider time zones. Segment your audience by time zone and schedule emails accordingly to ensure subscribers receive your messages at a convenient and optimal time.
Focus on Mobile Users
With 43.5% of all email opens happening on mobile devices, optimizing for mobile is crucial for any effective email marketing strategy. Think about it: one out of every three clicks in an email happens on a mobile device, and 60% of people check their emails first thing in the morning on their smartphones.
If your emails don’t render well on a small screen, subscribers are likely to hit the delete button without a second thought.
Here’s how to optimize your emails for mobile devices:
- Use responsive email templates. Ensure your emails look great on all devices by using mobile-friendly email templates that automatically adjust to different screen sizes;
- Keep content concise and scannable. Mobile users are often on the go, so keep your content concise and easy to digest. Use short paragraphs, bullet points, and clear headings;
- Use larger fonts and clickable buttons. Make it easy for mobile users to interact with your emails by using larger fonts and buttons that are easy to tap with a finger.
Measure Performance
You wouldn’t drive a car with your eyes closed, would you? The same goes for email marketing. Regularly tracking key metrics is crucial to understanding what’s working, what’s not, and where you can improve.
Email marketing metrics and KPIs provide valuable insights to guide your strategy and improve your results. Keep a close eye on your open, click-through, and conversion rates to gauge overall engagement and campaign effectiveness. Use the data you gather to conduct in-depth campaign performance analysis and make informed decisions about future campaigns.
Here are the key email marketing metrics to track:
- Open rates, click-through rates, conversion rates tell you how engaging your emails are and how effectively they’re driving conversions;
- Bounce rate and unsubscribe rate can alert you to problems with your email list or content..
Stay Compliant with Email Marketing Laws
Building trust with subscribers means respecting their inboxes and adhering to email marketing compliance regulations. Our help guide on CAN-SPAM and GDPR compliance covers the practical setup inside Sender. This isn’t just good practice – it’s the law. Failing to comply can severely damage your sender reputation and even lead to legal trouble. In fact, each separate email in violation of the CAN-SPAM Act can result in penalties of up to $53,088.
Here are three key aspects of email marketing compliance to keep in mind:
- Include an unsubscribe link. To comply with regulations like CAN-SPAM and GDPR email marketing, always provide a clear and easy-to-find unsubscribe link in all your emails. This gives subscribers control and reduces the likelihood of spam complaints, which have unfortunately become more common. The spam complaint rate has more than doubled to 0.07%, meaning more people are complaining rather than just unsubscribing;
- Use double opt-in for new subscribers. Double opt-in requires subscribers to confirm their subscription via email, ensuring they genuinely want to receive your emails. This proactive step reduces spam complaints and significantly improves deliverability;
- Clearly state how you’ll use subscriber data. Transparency is crucial for building trust. Be upfront about your data practices and provide a clear, accessible privacy policy. Clearly stating how you collect, store, and use subscriber data not only builds trust but also ensures compliance with regulations like GDPR.
Strategy lives on top of fundamentals. If any of the tactics above feel new, ground yourself in the broader email marketing fundamentals before layering them in